
Five Ordered Chains
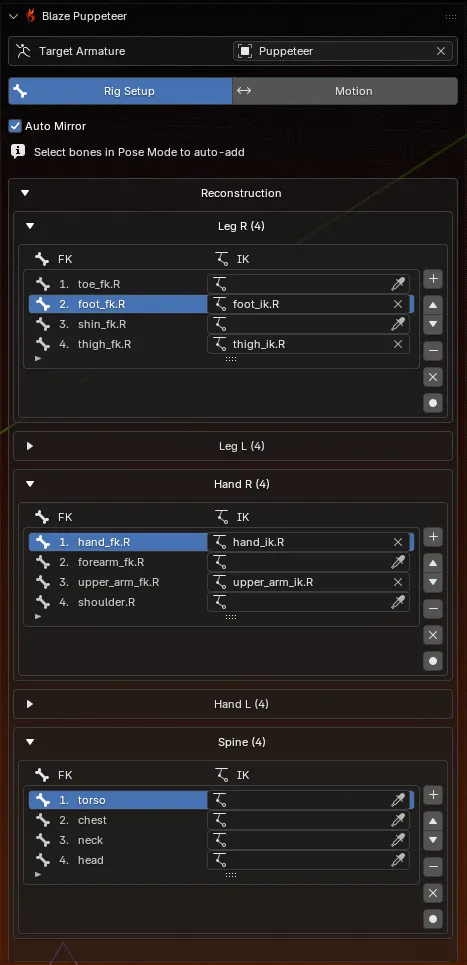
Fill the ordered lists for Leg R, Leg L, Hand R, Hand L, and Spine.
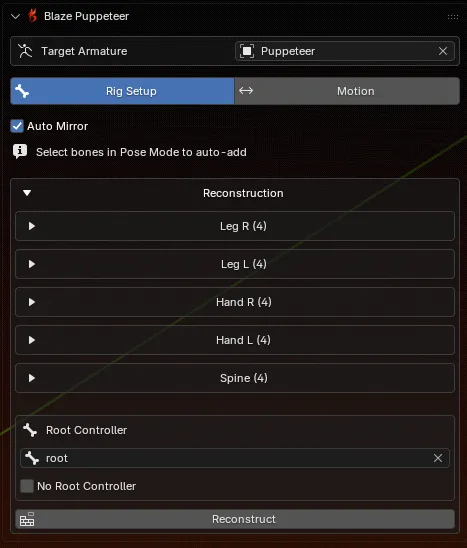
Rig Setup is where you assign rig controllers of different chains in a specific order. You do this once per rig.
Five Ordered Chains
Fill the ordered lists for Leg R, Leg L, Hand R, Hand L, and Spine.
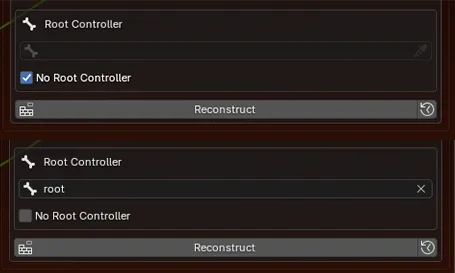
Root Controller Setup
Either assign a real root or master controller, or explicitly enable No Root Controller. Rig Setup does not guess this for you.
A Neutral T-Pose
After reconstruction, Blaze Puppeteer pauses for a two-stage T-pose alignment so the helper rig has a clean reference pose.
Optional IK Targets
IK assignments are optional, but they help Blaze Puppeteer transfer motion back onto the controllers you actually animate with.
| Group | Build the list in this order |
|---|---|
| Leg R / Leg L | Foot end (Toe/Heel) toward the body |
| Hand R / Hand L | Wrist or hand end toward the shoulder |
| Spine | Bottom to top |
Fill the FK side of each row and leave the IK side empty. Blaze Puppeteer can still generate and transfer motion with only the FK chain data.
Fill the FK entries first, then add matching IK controls where they make sense. The IK column exists to help Blaze Puppeteer transfer the finished motion back to the controls you actually animate with.
Open Rig Setup mode and select the correct character in Target Armature.
Auto Mirror helps fill the opposite side while you map left and right limbs. When auto mirror is enabled, any adjustments to one side of the rig will be mirrored to the other side. This includes adding, removing, clearing, and reordering bones.
Use either:
+) after selecting bones in Pose ModeReorder with the arrow buttons if needed. Remove, clear, or rebuild any list that ended up in the wrong order.
In the Root Controller section:
Blaze Puppeteer blocks reconstruction until one of those two choices is made.
Reconstruct rebuilds the helper rigs from your current lists and immediately moves into T-pose calibration.
In this step you need to adjust the pose of the character to have its arms extended horizontally and its legs straight (as opposed to an A-pose or an arbitrary pose). Use Confirm Front View first. Then check the top view and use Finalize T-Pose.
When you click Reconstruct, Blaze Puppeteer creates two helper armatures for the selected character:
| Helper | Purpose |
|---|---|
YourRig_Blazed | The meta-rig Blaze Puppeteer uses for generation and source data |
YourRig_TPOSE | The calibration rig used as retarget reference frame |
After the T-pose workflow is finalized, Blaze Puppeteer hides the helper collection so your scene stays cleaner. Treat these helpers as internal assets.

| Choice | What it means for later workflow |
|---|---|
| Root Controller assigned | Blaze Puppeteer can separate trajectory onto that control during PostPro |
| No Root Controller enabled | Generation still works, but the root extraction controls do not appear because there is no dedicated root control to write into |
Blaze Puppeteer stores the last reconstructed list data on the helper rig. If you change a chain afterward, the panel can warn that the current lists no longer match the last reconstruction. If you simply add IK controls to an already reconstructed rig, you do not need to reconstruct the rig again.
| Button | Use it when |
|---|---|
| Reconstruct | You want the helper rigs rebuilt from the new list data |
| Restore | You want to discard the edits and go back to the last reconstructed state |
Before switching to Motion: