
Installation
Install Blaze AutoPose as a Blender extension using the zip for your operating system. Keep the package zipped. The pose model and runtime are included; after installation, complete Rig Setup once for each character.
Minimum Requirements
Section titled “Minimum Requirements”| Blender | 4.5 or newer |
| Platforms | Windows x64, Linux x64, macOS Intel and Apple Silicon |
| Processor | 64-bit Intel, AMD, or Apple Silicon CPU |
| Graphics | No dedicated GPU required. AutoPose solves on the CPU. |
See Limitations for supported character types and posing controls.
Linux x64 packages also support Blender builds that use Python 3.14, including Arch Linux. AutoPose uses the Python bundled with Blender; changing your system Python is not necessary.
Step 1: Install The Extension
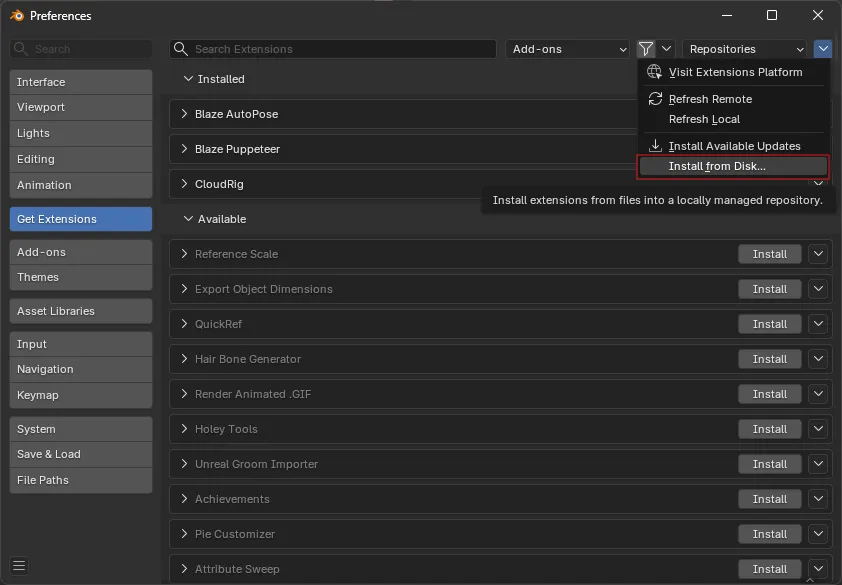
Section titled “Step 1: Install The Extension”If you have connected Superhive’s extension repository to Blender, open Preferences → Get Extensions, find Blaze AutoPose, and click Install. See Superhive’s extension guide for repository setup. For a downloaded ZIP, follow the steps below.
-
Download the archive
Section titled “Download the archive”Download the Blaze AutoPose extension package for your operating system from your purchase page or your order page on Superhive Market. Keep the package zipped.
-
Open Blender Preferences
Section titled “Open Blender Preferences”Open Edit → Preferences in Blender.
-
Install the zip
Section titled “Install the zip”Either drag the zip file into Blender, or open Get Extensions, open the top-right menu, choose Install from Disk…, and select the zip file.
-
Enable Blaze AutoPose
Section titled “Enable Blaze AutoPose”Confirm the extension is enabled in the list. If the panel does not appear right away, disable and re-enable the extension, or restart Blender.
Step 2: Open The Panel
Section titled “Step 2: Open The Panel”Blaze AutoPose lives in the 3D Viewport sidebar.
- Hover the 3D Viewport and press N to open the sidebar.
- Choose the Blaze AutoPose tab.
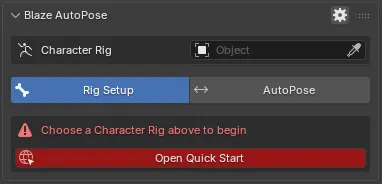
The panel opens on Character Rig at the top, with two modes underneath it: Rig Setup and AutoPose. Everything you do with the add-on starts by choosing a character in that first field.
Step 3: Review Preferences
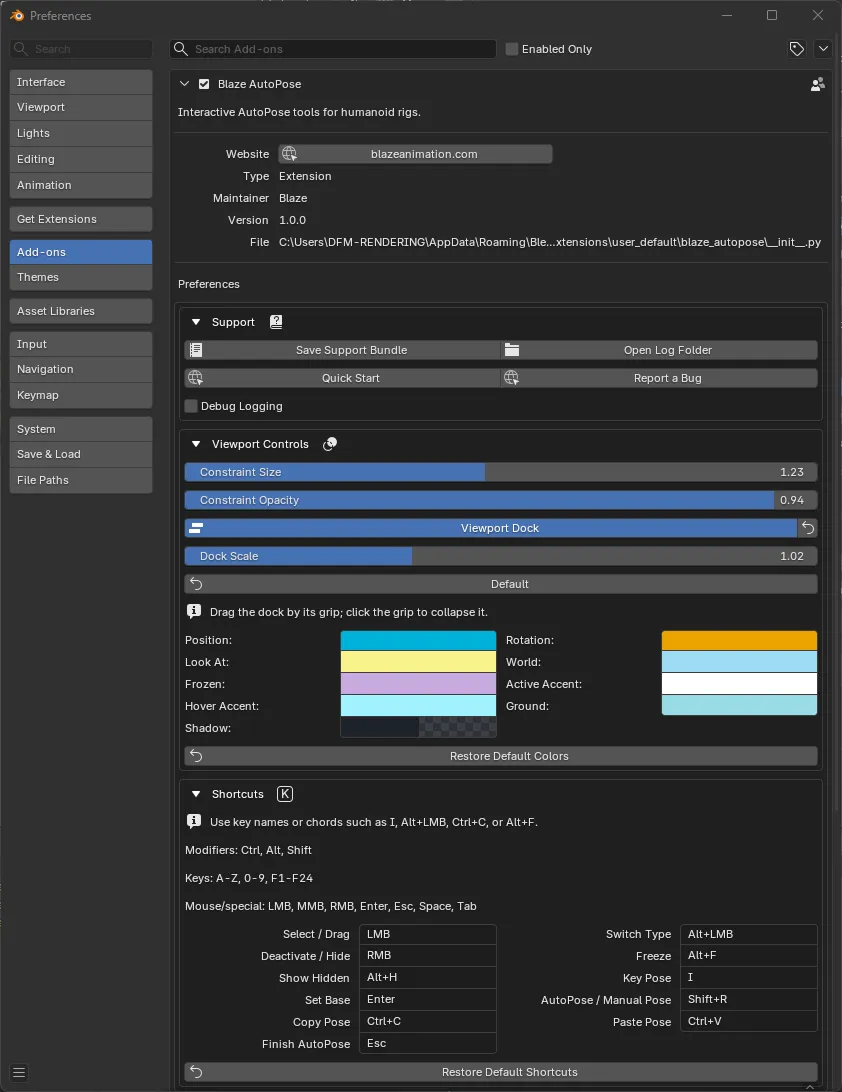
Section titled “Step 3: Review Preferences”Open Edit → Preferences → Add-ons → Blaze AutoPose. The preferences are grouped into three sections, and none of them have to be changed before your first pose.
| Section | What is in it |
|---|---|
| Support | Save Support Bundle, Open Log Folder, Quick Start, Report a Bug, Debug Logging |
| Viewport Controls | Handle size and opacity, the viewport dock, and the full colour palette for the handles |
| Shortcuts | Every AutoPose key and mouse binding, each one rebindable |
Interface & Preferences walks through all of them. For now the useful ones to know about are Constraint Size and Constraint Opacity, which make the handles easier to see on a dense character, and Viewport Dock, which puts the common actions on a floating bar inside the viewport.
What To Do Next
Section titled “What To Do Next”The extension being installed is only half of it. AutoPose still has to be told which controllers on your character it is allowed to pose, and that is a separate, once-per-character pass.
Go to Rig Setup next, or follow Quick Start for the shortest route from here to a finished pose.
Updating Blaze AutoPose
Section titled “Updating Blaze AutoPose”If you installed AutoPose through Superhive’s extension repository, update it under Preferences → Get Extensions. Otherwise, download the latest ZIP from your purchase page and use Install from Disk… again. You do not need to uninstall the old build first. Restart Blender after updating.
Rig setup data stays inside your .blend file, so updating the add-on preserves your mapping. Local rigs store it on the armature; linked characters use a separate setup in the scene for each library override.
The installed version appears beside Blaze AutoPose at the top of the panel. See the AutoPose changelog for what’s changed in 1.1.1.