
Quick Start
This page takes one character from nothing to a finished, keyed pose. It is the fastest way to confirm that the add-on and your rig are both ready.
The Whole Thing In Six Steps
Section titled “The Whole Thing In Six Steps”-
Select the character
Section titled “Select the character”Open the Blaze AutoPose panel in the 3D Viewport sidebar and pick your armature in Character Rig.
-
Map the rig
Section titled “Map the rig”In Rig Setup, choose your rig family in 1. Choose Rig Mapping and press Apply Preset, or press Auto Detect and let AutoPose recognise it. For a custom rig, fill the five chain lists by hand.
-
Reconstruct
Section titled “Reconstruct”Open 3. Build AutoPose Rig and press Reconstruct AutoPose Rig.
-
Confirm the T-pose
Section titled “Confirm the T-pose”Put the generated
_TPOSErig into a clean T-pose, press Confirm Front View, check it from the top, then press Finalize T-Pose. -
Start AutoPose
Section titled “Start AutoPose”Switch the panel to AutoPose and press the big Start AutoPose button. The handles appear on the character.
-
Drag, then finish
Section titled “Drag, then finish”Drag a wrist. Drag a foot. Press I to key the pose if you want it on the timeline, then press Esc or Finish AutoPose.
Pick Your Starting Path
Section titled “Pick Your Starting Path”If your character is a Rigify, Auto-Rig Pro, CloudRig, Mixamo, or Puppet Studio rig, the mapping is already written for you.
-
Apply the preset
Section titled “Apply the preset”In 1. Choose Rig Mapping, choose the family from the dropdown and press Apply Preset. If you are not sure which one it is, press Auto Detect instead.
-
Glance at the result
Section titled “Glance at the result”Expand 2. Review Controller Mapping. Every chain should read Valid. A chain that reads Needs attention tells you exactly what is wrong underneath it.
Always inspect the lists before reconstruction. Rig versions and custom edits can change controller names even when the preset family is correct.
-
Reconstruct and finish the T-pose
Section titled “Reconstruct and finish the T-pose”Press Reconstruct AutoPose Rig, then complete the two T-pose confirmation steps.
A custom rig takes a few more minutes, once.
-
Try Auto Detect first
Section titled “Try Auto Detect first”It is worth a try even on a custom rig. If it fills the chains correctly, you have saved yourself the work.
-
Fill the five chains
Section titled “Fill the five chains”Expand 2. Review Controller Mapping and build Right Leg, Left Leg, Right Hand, Left Hand, and Spine using the + button or the REC button.
-
Check the order
Section titled “Check the order”Legs and arms are built from the end of the limb inward. The spine is built from the hips upward. Rig Setup has the exact order for each chain.
-
Reconstruct and finish the T-pose
Section titled “Reconstruct and finish the T-pose”Same as any other rig.
Your First Drag
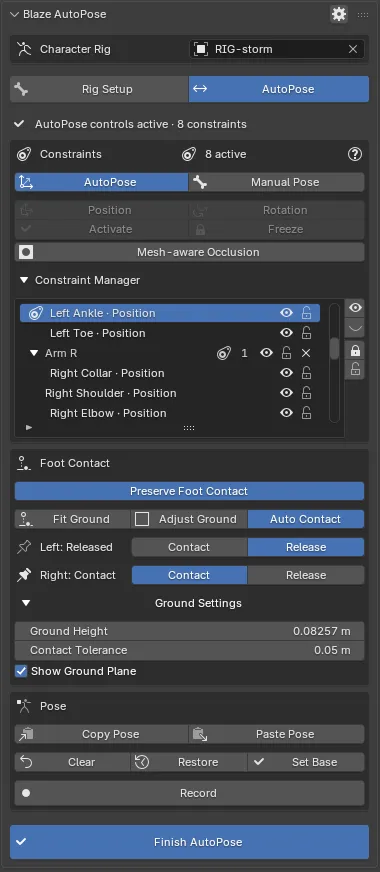
Section titled “Your First Drag”With the session running, try this in order. It is the quickest way to get a feel for how AutoPose responds.
- Drag a wrist handle across the viewport. The arm, shoulder, and spine follow it.
- Drag the other wrist. The first one stays roughly where you put it, because an active constraint keeps conditioning every later solve.
- Drag a foot. The hips and the whole lower body adjust underneath the pose you have built.
- Alt-click the head handle to switch it between position and rotation, and see the difference in what it controls.
- Press Enter when the pose is close. This saves the current pose as a Restore checkpoint and clears the constraints. It is optional: every drag already starts from the pose visible before you begin dragging.
Saving The Result
Section titled “Saving The Result”You have three ways to keep what you made, and they are not exclusive.
| Action | What it does |
|---|---|
| Finish AutoPose (Esc) | Ends the session and leaves the current pose on your FK controllers |
| Press I | Inserts normal Blender keyframes on those controllers at the current frame |
| Record | Captures every solve while you drag and bakes them to consecutive frames when you stop |
Checklist Before You Judge The Result
Section titled “Checklist Before You Judge The Result”If something looks wrong, run through this list before changing anything:
- The correct character is chosen in Character Rig.
- Every chain in Review Controller Mapping reads Valid.
- The panel is not warning that the Controller mapping changed.
- The T-pose you confirmed was actually a T-pose, with the arms out and the legs straight.
- You are in AutoPose and not Manual Pose.
If the list is clean and the result still is not, Troubleshooting covers the common causes.
Where To Go Next
Section titled “Where To Go Next”- Posing With Constraints for the full posing toolkit.
- Foot Contact & Ground when the character needs to stand on something.
- Poses & Animation for keying, recording, and moving poses between frames.