
Untouched joints are free
Anything you have not constrained is allowed to move. That is what lets one drag change the whole body.
Use the viewport handles to guide the parts of the pose that matter. Each active constraint describes an intended position or orientation, and AutoPose adapts the rest of the body around it.
Switch the panel to AutoPose and press Start AutoPose. The handles appear and the viewport is now listening to you.
Press Esc, or the same button again (now reading Finish AutoPose), to end the session. Finishing keeps the current pose on your rig’s own FK controllers. Nothing is lost by leaving, and nothing has to be committed first.
AutoPose also finishes when you switch to Object Mode or another mode outside Pose Mode, preserving the current pose. Press Start AutoPose when you want to resume.
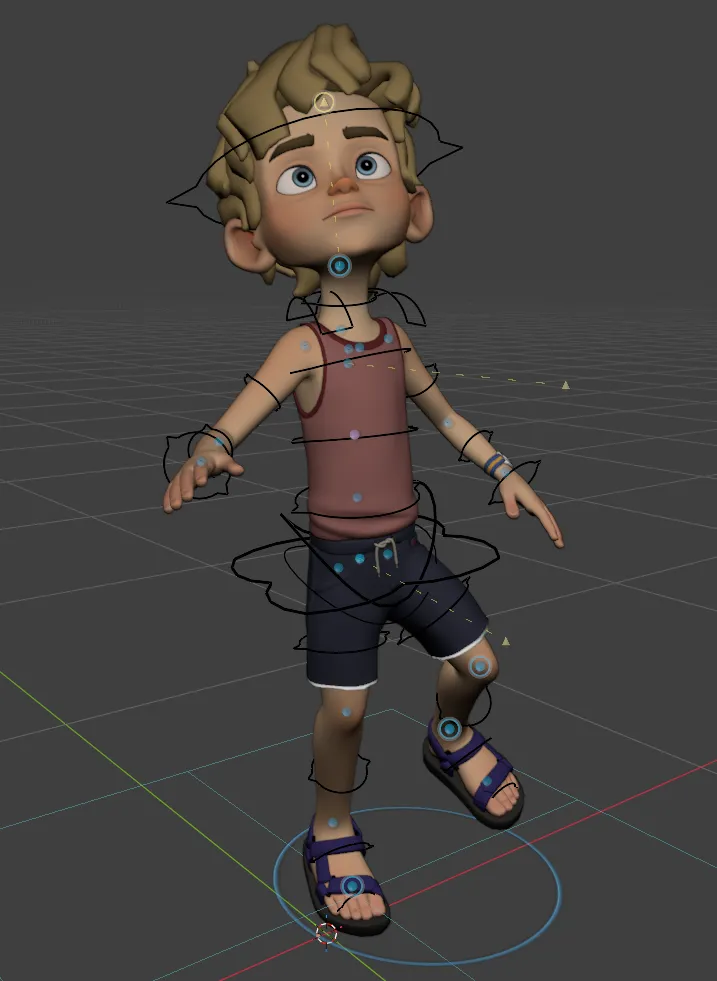
A constraint is a guide for one joint. “Bring this wrist toward here.” “Turn this foot toward this orientation.” AutoPose considers every active guide and produces the body pose that satisfies them best while staying close to the pose that was visible when the current drag began.
Three things follow from that, and they explain most of what you will see:
Untouched joints are free
Anything you have not constrained is allowed to move. That is what lets one drag change the whole body.
Active constraints keep applying
A constraint you placed earlier still guides every later solve. It does not stop mattering after the drag ends, but it can shift when the pose has competing instructions.
Fewer is usually better
Each active constraint reduces how freely AutoPose can adapt the remaining body. Use only the constraints that define the pose; three or four is often enough.
The constraints are soft rather than exact locks. When constraints conflict, the control you are currently dragging takes priority and the other active targets may move enough to make the pose work.
Every handle can be one of these. The type decides what the handle is telling AutoPose. The swatches show the default viewport colours, which you can change in Preferences.
| Type | Colour | What it controls | Where you can use it |
|---|---|---|---|
| Position | Guide this joint toward a point | Any joint | |
| Rotation | Guide this joint toward an orientation | Any joint | |
| Look At | Orient this part of the body toward a target | Hips, chest, and head | |
| World | Move the whole character in the scene | The character as a whole |
Switch a handle between Position and Rotation by holding Alt and clicking it, or with the two buttons at the top of the panel when it is selected. Switching type does not move the pose.
The hips, chest, and head each carry an extra Look At target on top of their normal handle. Drag the target to orient that part of the body toward a point in the scene.
Look-at is complementary rather than exclusive: a joint can have a position or rotation constraint and a look-at at the same time, and the two are manipulated independently. It is the natural tool for eyeline, for turning the chest into or away from an action, and for keeping the head engaged with something in the scene while the body does its own thing.
The world control is the large light-blue ring around the character’s feet. Drag it to move the armature object in the scene without changing the pose.
Each state and type has its own colour, and all of them are yours to change under Preferences → Viewport Controls.
A resting control is slightly transparent. Hovering makes it brighter and shows a small card with the joint name, constraint type, current state, and the shortcut available at that moment. Active constraints have an extra ring around the handle.
| Colour role | Means |
|---|---|
| Position | A position constraint |
| Rotation | A rotation constraint |
| Look At | A look-at target |
| World | The character world control |
| Frozen | This handle is locked against editing |
| Hover accent | The pointer is over this handle |
| Active accent | This handle is the one being manipulated |
| Do this | To get this |
|---|---|
| LMB drag on a handle | Move a position handle, or manipulate the active rotation or look-at handle |
| LMB click on a handle | Select and activate it, then show its gizmo |
| Shift + LMB | Add another position handle to the selection group |
| G with a handle selected | Switch it to Position and begin moving it |
| R with a handle selected | Switch it to Rotation and begin rotating it |
Position handles can be moved as a selected group; rotation and look-at handles are manipulated one at a time. All handle transforms support Blender’s familiar controls: type a number, press X, Y, or Z to constrain an axis, hold Shift for a fine adjustment, or right-click to cancel.
Select a constraint, or hold Shift to select several, then press Alt + R to reset rotation or Alt + G to reset location on their mapped rig controls. This resets the selected channels; it is different from Restore, which returns to your saved pose checkpoint.
Resetting releases the selected controls’ position or rotation constraints unless they are frozen. Any separate Look At constraint remains active.
Ctrl + Z undoes the last AutoPose drag or constraint change. Ctrl + Shift + Z redoes it.
While a drag is still in progress, press RMB to cancel it and return to the pose from before that drag. Restore is different: it returns to the checkpoint saved with Set Base.
Three different ways to get a handle out of your way, for three different reasons.
RMB on an active handle deactivates it. The constraint stops conditioning the solve, and the pose does not move when you do it.
Use it when a constraint has done its job and you want the joint free again for the next drag.
You can also do it from the panel with the Deactivate button, or clear every constraint at once with Clear.
Alt + F freezes the handle under the pointer, and again to unfreeze it. Freezing prevents selection or editing without changing whether the constraint is active. An active constraint continues guiding the solve while frozen; an inactive constraint remains inactive.
Freezing protects the handle from input. It does not turn a soft constraint into an exact lock, so the target can still shift slightly when the solve has competing instructions.
RMB on a handle that is already inactive hides it. Hiding is purely visual: it takes the handle off the screen and has no effect on the solve.
Use it when a dense area, usually around the spine or a shoulder, has more handles than you can comfortably click through.
Alt + H brings every hidden AutoPose handle back. It only ever affects AutoPose’s own handles, never your rig’s hidden bones or objects.
The panel mirrors what the viewport is doing, and adds the bulk operations that are awkward to do by hand.
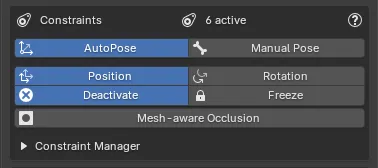
| Control | What it does |
|---|---|
| Active count | How many constraints are currently conditioning the solve, up to the maximum of 16 |
| ? | Opens the shortcut list, using your own bindings |
| AutoPose / Manual Pose | Switches between the two posing modes |
| Position / Rotation | Sets the type of the selected handle |
| Activate / Deactivate | Turns the selected constraint on or off without moving the pose |
| Freeze / Unfreeze | Locks or unlocks the selected handle |
| Mesh-aware Occlusion | Dims handles that sit behind the character’s mesh |
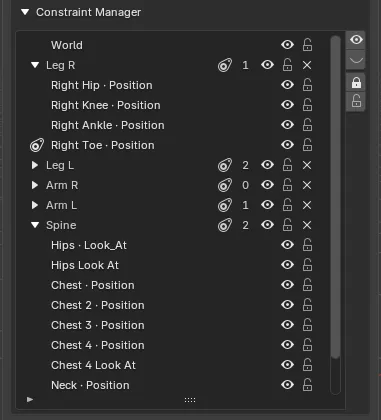
Expand Constraint Manager for the full list, grouped into Leg R, Leg L, Arm R, Arm L, and Spine. Every joint AutoPose knows about is in here, with its look-at target listed beneath it where one exists.
Use the controls in each body section as follows:
| Control | Effect |
|---|---|
| Section arrow | Expands or collapses that body section without changing any constraint state |
| Section count | Shows how many constraints are active in that body section |
| Section eye | Shows or hides every handle in the section; visibility does not affect the solve |
| Section lock | Freezes or unfreezes every visible handle in the section without changing which constraints are active |
| Section X | Deactivates every active constraint in the section without changing the current pose |
| Constraint row | Selects that handle in the viewport; Look At controls have their own rows where available |
| Row eye | Shows or hides only that handle |
| Row lock | Freezes or unfreezes only that handle |
The buttons beside the full list apply the same visibility and freeze actions to all handles, rather than one body section.
Sometimes a pose needs something AutoPose is not for: a finger curl, a facial control, or one bone nudged by two degrees. Press Shift + R, or use the Manual Pose button, and the handles step aside so you can work on the rig directly in Blender’s own Pose Mode.
While you are in Manual Pose, the panel says so plainly and offers one large button back. Nothing is solving, and every normal Blender tool behaves the way it always does.
AutoPose temporarily adjusts some rig locks, drivers, and constraints while it is active. Version 1.1.1 restores those settings when you switch to Manual Pose, finish AutoPose, save and reopen the scene, or recover it after an interruption.
The FK toggle beside Manual Pose controls the handoff:
Press Shift + R again, or Return to AutoPose, to bring the handles back. Your manual edit stays visible and becomes the starting pose for the next drag. It does not replace the saved Restore checkpoint.
If you posed with IK, use your rig’s own IK-to-FK snapping and activate its FK controls before returning. AutoPose shows a reminder for this; choose Don’t show again to dismiss future reminders, or restore them under Preferences → Viewport Controls → Show FK Reminder.