
Rig Setup
Rig Setup tells AutoPose which FK controllers on your character receive the pose, and in what order they run through each limb. You normally do this once per character and reconstruct again only when the mapping changes.
The mode is laid out as three numbered steps, top to bottom.
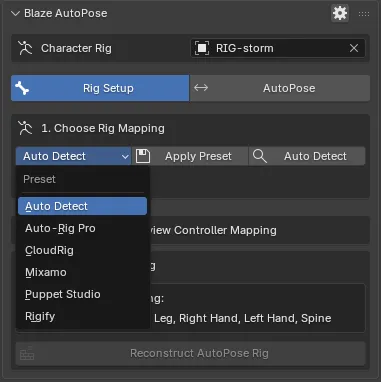
1. Choose Rig Mapping
Section titled “1. Choose Rig Mapping”The fastest way through Rig Setup is not to do it by hand.
| Control | What it does |
|---|---|
| Preset dropdown + Apply Preset | Fills all five chains from a known rig family |
| Auto Detect | Looks at the bone names in your rig and applies the preset that matches |
| Mirror Left / Right | Mirrors your edits to the opposite limb while you work |
AutoPose includes presets for:
- Rigify
- Auto-Rig Pro
- CloudRig
- Mixamo
- Puppet Studio
Custom rigs are supported through manual mapping.
2. Review Controller Mapping
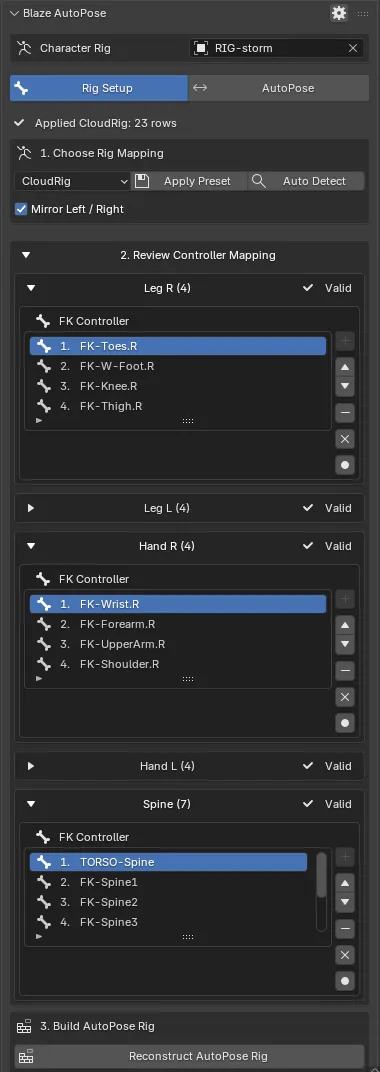
Section titled “2. Review Controller Mapping”Expand this section to see the five chains. Each one carries a badge: Valid or Needs attention. If a preset filled everything correctly, all five read Valid and you can move straight to step 3.
Chain Order
Section titled “Chain Order”This is the part that matters. Each list is ordered, and the order describes how the chain runs through the body.
| Chain | Build the list in this order |
|---|---|
| Leg R / Leg L | From the end of the foot inward: toe, foot, shin, thigh |
| Hand R / Hand L | From the wrist inward: hand, forearm, upper arm, shoulder |
| Spine | From the lower torso upward: torso or lower spine, chest, neck, head |
Filling A Chain By Hand
Section titled “Filling A Chain By Hand”Each chain has its own set of buttons down the right-hand side of the list.
| Button | What it does |
|---|---|
| + | Adds the bone that is active in Pose Mode |
| ▲ ▼ | Moves the selected entry up or down the chain |
| – | Removes the selected entry |
| ✕ | Clears the whole chain |
| REC | Stays on and captures each bone you select, in the order you select them |
REC is usually the quickest route: turn it on for a chain, then click down the limb in order in Pose Mode. Turn it off when the chain is complete.
Which Controllers To Pick
Section titled “Which Controllers To Pick”Map the FK controls. Those are the ones AutoPose reads and writes.
Pick the controller that actually rotates the segment, not a deform bone and not a helper. If your rig has both an FK control and an underlying deform bone for the upper arm, the FK control is the one to map.
Fingers are not supported. Do not add finger controls to the hand lists.
The first entry in the spine chain is special: it is the controller AutoPose treats as the base of the character. It is the only controller that receives both location and rotation. Every other mapped controller receives rotation only, and existing scale is left alone.
Start the spine at the lowest torso controller that continues upward through the spine, then end at the head. Avoid a controller that only drives a lower chain or moves the legs without belonging to the upward torso chain.
AutoPose poses through FK. On a rig with both, map the FK side.
AutoPose does not write to IK controllers. If you want to continue in IK, finish the AutoPose result on FK and use your rig’s own FK-to-IK snapping workflow afterwards.
3. Build AutoPose Rig
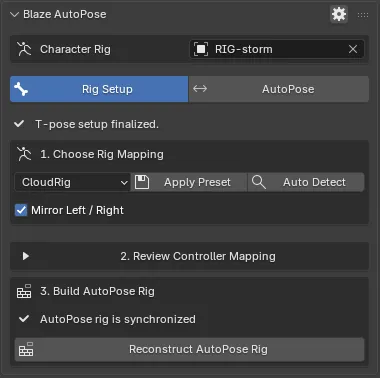
Section titled “3. Build AutoPose Rig”Press Reconstruct AutoPose Rig. This builds the helper rigs AutoPose poses through, and immediately moves into T-pose calibration.
The button stays disabled until the mapping is usable. If it is greyed out, the panel lists why under Before reconstructing: - usually a chain that is still empty, or a REC button that is still on.
If Your Controllers Are Locked Or Driven
Section titled “If Your Controllers Are Locked Or Driven”Some rigs lock transform channels on their controllers, or drive them from other controls. AutoPose cannot write a pose onto a channel that is locked or driven, so if it finds any among the controllers you mapped, it stops and asks first.
The dialog is titled Mapped controller restrictions detected and names the affected bones. Continuing unlocks those mapped transform channels and mutes their drivers so AutoPose can move them. Cancelling leaves your rig exactly as it was.
What Reconstruct Creates
Section titled “What Reconstruct Creates”Reconstruction adds three helper armatures next to your character:
| Helper | What it is for |
|---|---|
YourRig_Blazed | The proxy rig AutoPose poses on |
YourRig_AutoPose100 | The bridge between the proxy and your controllers |
YourRig_TPOSE | The calibration rig used as the reference pose |
The T-Pose Confirmation
Section titled “The T-Pose Confirmation”Reconstruction pauses on a two-stage alignment step. AutoPose needs a clean reference pose to measure your character against, and it asks you to confirm it rather than guessing.
-
Front view
Section titled “Front view”The panel switches to T-Pose Alignment - Front View and points at the generated
_TPOSErig. Pose it into a proper T: arms straight out to the sides, legs straight down. Press Confirm Front View. -
Top view
Section titled “Top view”The panel switches to T-Pose Alignment - Top View. Look from above and check that the arms are straight along the axis and not swept forward or back. Fix anything that is off, then press Finalize T-Pose.
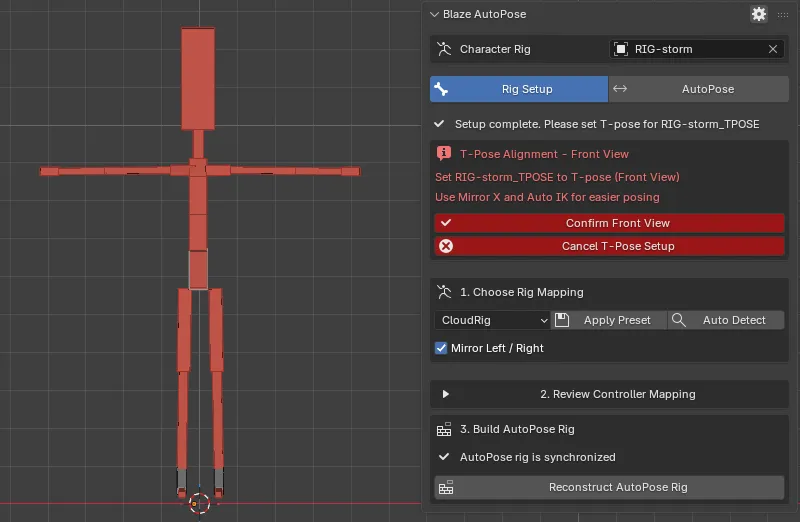
Cancel T-Pose Setup leaves the workflow without accepting the alignment, if you need to get out and come back to it.
If You Change The Mapping Later
Section titled “If You Change The Mapping Later”AutoPose remembers what the helper rigs were built from. Change a chain afterwards, and step 3 warns you:
| What the panel says | What it means |
|---|---|
| AutoPose rig is synchronized | The helpers match the current mapping. Nothing to do. |
| Controller mapping changed | The mapping and the helpers disagree. Press Reconstruct AutoPose Rig to bring them back in step. |
Reconstructing again is safe and normal. It keeps the T-pose calibration you already confirmed.
Linked Characters
Section titled “Linked Characters”AutoPose 1.1.0 supports linked characters through editable Blender library overrides. You can keep the source character linked while posing, keyframing, and recording in your scene.
- Link the character collection into your scene and create an editable library override using Blender’s library override tools.
- Select the override armature in Character Rig.
- Review the mapping, reconstruct, and complete T-pose confirmation as usual.
Each character instance has its own AutoPose setup, saved in the scene. Selecting or reconstructing the rig preserves its current pose and unkeyed edits; reconstruction also keeps your timeline position.
A direct, read-only link cannot be posed. If setup is unavailable, check that you selected the editable override rather than the original linked armature. AutoPose also warns you to reconstruct if the linked rig’s rest structure changes after an asset update.
Ready To Pose When
Section titled “Ready To Pose When”- All five chains read Valid.
- Step 3 reports AutoPose rig is synchronized.
- The T-pose workflow is finished, not cancelled.
Switch the panel to AutoPose and continue with Posing With Constraints.